My Lovely Followers

Showing posts with label festive nails. Show all posts

Monday, March 17, 2014

HOLI INSPIRED NAIL ART WITH DOTS

                     Happy Holi friends!!! Here is yet another colorful Holi inspired nail art which is simple yet very pretty. You just need your colors and your dotting tools to recreate this design. Here I have lots of dots all over my nails in different sizes and vibrant colors. I request you not to aim for perfect dots.


So here is the pictorial of the nail art I created for today. Enjoy.....


Step 1- For the base coat today I have applied a coat of Oriflame Very Me Base & Top Coat.


Step 2- After that I painted my nails with Colorbar Nail Lacquer Exclusive 37, two coats were enough.


Step 3- I painted pink uneven dots on all the nails with the help of a toothpick.


Step 4- I painted yellow uneven dots on all the nails with the help of a toothpick.


Step 5- I added green uneven dots on all the nails with the help of a toothpick.


Step 6- I added blue uneven dots on all the nails with the help of a toothpick.


Step 7- I painted red and orange uneven dots on all the nails with the help of a toothpick again


Step 8- I added Oriflame Very Me Base & Top Coat to seal my piece of art and protect the design. Done!!!!


Thanks for bearing with me and have a Colorful Evening ahead :)


Sunday, March 16, 2014

HOLI INSPIRED NAIL ART

                             Happy Holi to my dearest readers, lovely followers and sweet friends. Holi, the festival of colors is also a spring festival. Holi marks the end of winter and arrival of spring, Holi signifies the victory of good over evil. Here is a very colorful nail art with splashes of vibrant color, my aim was to make my nails look stained with different colors but I didn't think this would be the outcome. I am not sure whether I like this design or not :P It was not possible to take pics of all the steps but I think the pics/steps given below are enough for my dear girlies to understand what's going on. Also the green looks muted and dull in the pics below, it actually is a bright green :/


So here is the pictorial of the nail art I created for today. Enjoy.....


Step 1- For the base coat today I have applied a coat of Oriflame Very Me Base & Top Coat.
Step 2- After that I painted my nails with Colorbar Nail Lacquer Exclusive 37, two coats were enough.


Step 3- I painted pink and orange uneven spot on all the nails with the help of a very fine tipped small brush.


Step 4- Gradually I kept adding the colors one by one; green, red & yellow and kept some space for blue.


Step 5- Finally I added the blue in the gaps and cleaned up the extra polish.


Step 6- I added Oriflame Very Me Base & Top Coat to seal my piece of art and protect the design. Done!!!!


Thanks for bearing with me and have a Good Night ahead :)


Saturday, April 21, 2012

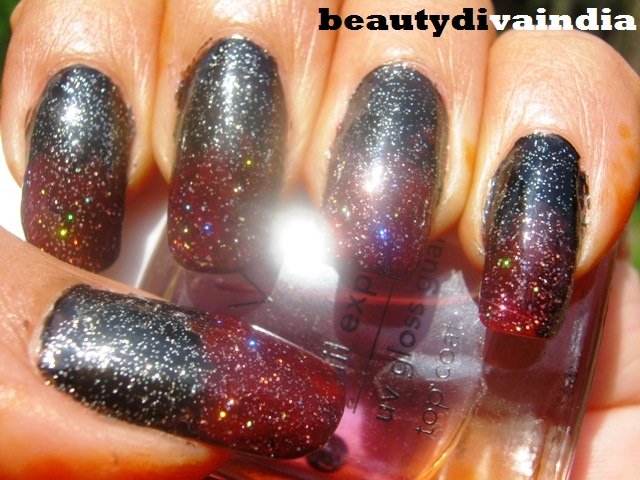
BLACK & RED NAIL ART WITH GLITTERS

                   Hello girls, today I have a nail art on my nails which I can't decide what to call- ombre, gradient, dont know what. I shall call it black and red nail art :D Hope you enjoy the pics and leave behind your precious comments. Thanks in advance for bearing with me :)

** All the pics are taken in artificial lighting**


This is the only pic taken in sunlight

Thursday, October 27, 2011

STREETWEAR COLOR RICH NAIL ENAMEL-TANGERINE- SWATCHES & REVIEW


5 ml for INR 45

Company Says:- Nothing as such


My Opinion:-
Street Wear is one brand I cannot resist. Whenever I happen to see their nail enamels, I buy 1 or 2. I love the huge color selection they offer, they have reds, maroons, nudes, pinks, browns, metalics, blues/greens etc. The glass bottle is cute and small around 2 1/2 inches in height. It is squarish in shape with a black lid just enough to hold it comfortably.

The brush is good enough and gives even application. The texture of this nail polish is smooth and the consistency is thin and hence it glides with ease. The color payoff is very good, its very well pigmented. Another good quality is that this nail polish dries fast and you dont have to wait and wait for it dry till hours without using your fingers/hands.

Tangerine is a reddish orange or orange-y red shade with similar colored shimmer and also golden glitters, but it is not much visible unless you observe very hard. The color stayed on my nail for 5 days with a top coat on and after that I removed it. It did not fade or chipped during this period. It stayed fresh all these days. Also only a single coat was enough for full opacity but I applied the second coat to bring out the full intensity of this gorgeous shade.

Pros:-
* Dirt cheap, good for experimenting different shades
* Lots of gorgeous shades available
* Contains only 5 ml hence finishes off soon
* Easily available
* Color payoff is satisfactory
* Long lasting

Cons:-
* Not DBP free
No cons actually ;)

I rate this product 4.5 out of 5. I bought the shade Tangerine because it was love at first sight. This gorgeous red is just the right shade to go with the festivities of Navaratri/Durga Puja. Totally loving it as of now.

Saturday, June 25, 2011

AVON NAILPOLISH HAUL

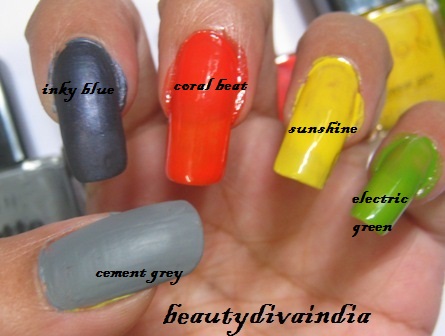
               Hi girls, this is a small nailpolish haul. I had ordered 8 but got only 5 since the other 3 are out of stock. Right now Avon has an amazing offer going on. The price of Avon Nailwear Pro (Matte/Neon/Normal) range is Rs 135 each but this month they are selling 2 nailpolishes for Rs 159

              Cement Grey is from the matte range. Its a true grey and looks like freshly mixed cement. Its very pigmented and a single coat is enough for full opacity.

              Inky Blue is also from the matte range. It looks purplish and shimmery in the bottle but its much bluish on the nails and it comes with purple shimmer. A single coat is enough for full opacity.

              Coral Beat is a bright orange. Its from the neon range and needs 3 coats for full opacity. It is very glossy though.

              Sunshine is a bright yellow. It is also from the neon range and needs atleast 3 coats for full opacity. It is very glossy.

               Electric Green is a leafy green color. It is glossy and needs 3 coats for full opacity. This too is from the neon range.

               All colors dries very quickly and are long lasting. Looks freshly applied for about a week or more. Hope to get other 3 colors soon. Thanks :)

Wednesday, May 11, 2011

BRIDAL NAIL ART WITH COLORFUL RHINESTONES


                  Hello Ladies, today I have a simple nailart to share with you. Last week my cousin got engaged and I had to dress up for the party. When it comes to parties, the first thing that comes to me is to dress up my nails and the second thing is my eye makeup (I will share this later)


First Step


                         Here I have used a nail polish from Oriflame, its a greyish-blue-ish silvery color and then I used orange, magenta, white and other rhinestones on my nails. I sealed in the rhinestone with 2 coats of top coat. Hope you enjoyed my work. Thanks for bearing with me :D


Tuesday, January 25, 2011

REPUBLIC DAY NAIL ART

Final Look


Wish you all a very happy Repulic Day. I had not posted for few days as I was a little busy with my work. Since its Repuic Day Eve I thought of trying out a simple tri-color look on my nails. I used 3 colors- orange, white and green, tried using navy blue also but ended up using black :P So here is how I did my nails this time.


I began with applying colorbar nail treatment and let it dry out completely.


* Then I drew the pattern with a marker on all my nails.

* Now I filled in the white polish at first as it is easy to apply this way.


* When the white polish was dry, I applied green polish on 1 side of the white part and orange on the other side of the white part.

* Now I left it to dry completely and then give it a black border as it was looking too simple.


* Finally I sealed in my masterpiece :p with a top coat and I was done.


             Thanks you Ladies for bearing with me :D. Please do leave behind your precious comments. Thanks


LONG LIVE INDIA


Monday, November 22, 2010

RED AND BLUE BRIDAL NAIL ART


                Hi Ladies, I am here with a bridal nail art today. I have used crimson and a shimmery blue for this art. But you can use any combination you can think of or you can use the color combination of your bridal attire.


                I will try to simplify the steps as much as possible. If you have a steady hand and you know a little mehendi art you can create this one easily. You can ofcourse come up with any perceivable patterns/designs if you wish. Designs are completely your choice and up to your imagination.


Prep up your nails and apply 2 coats of the crimson nail polish. Let it dry completely.


If you want you can use a cd/dvd pen to make the blueprint first.


                      Now draw the designs on your nails. I did 2 different designs on 1 hand. Thumb, middle finger and the pinky in 1 design and index and ring finger in another design.


Outline the designs with the shimmery blue color. And let it dry completely before applying top coat.


Now you can decorate with rhinestones or other nail art jewels. I used pretty blue stones on my nails.


Apply top coat to protect and seal in your masterpiece :D You are done.


**I will be coming up with a series of posts on bridal skin care, hair care, nail art and makeup from now on**


Thanks you all for bearing with me and please do leave your comments, your comments make my day :))


Sunday, November 7, 2010

FLORAL TOE NAIL ART

Final look


Hi Babes, I am back with a toe nailart and hope you all like it. This is very very simple and anyone can recreate it. Here are the steps to achieving this look.


Start with nail hardener, base coat, ridge filler (whatever you use) and when these are completely dry apply two coats of magenta nail polish. let it dry completely.


Now take the palest pink you have and make dots with a toothpick and slightly pull in the dots inside with the toothpick itself. When finished it will look very much like a flower.


I have done 2 flowers on each big toe nails and 1 each on the rest of the toe nails.


Leave it to dry completely and apply top coat. but don't wait for it the top coat to dry. Place white rhinestones on the middle of each flower on each toe.

Apply top coat again on nails and you are done. You see its as simple as that.


Try it out and lemme know how it worked for you.

Sunday, October 31, 2010

MY DIWALI NAIL ART


Hi Beauties, wish you all a very happy Diwali and happy Dhanteras in advance. With all the shine and glitter of this festive season, I planned my Diwali nails today. Here are the steps on doing them up.

* The first step is applying an opaque black nail polish, two coats should be enough. Let it dry properly before beginning the second step.

* Now mix some golden glitter with clear polish, using a simple painting brush or nail art brush paint the tips only with the glitter.


* Let it dry, it will take quite some time to dry, so be patient.

* After the tips dry, pour some golden nail polish on a paper and using a thin painting brush or nail art brush, paint on the design on each nail one by one.

* Leave it to dry for sometimes and follow the above step once more to make the gold outline intense. Once again let it dry.


* Now leave it like this if you like or you can add glitter to the design, I added glitter to my design because I wanted my nails to be very sparkly for this Diwali.

* The pic on the top right is final look after applying top coat and cleaning the extra color from around the nails.

Though I am not an artist I tried my best :-D and hope that you all like my masterpiece.... hehehe.... and comment about it.


Wednesday, October 27, 2010

FLORAL NAIL ART


I tried another nailart last week, the floral nailart. Didn't turn out very well but then I am not an artist is known to all of you. So here are steps on how I did my floral nails.

At first I applied a base coat and let it dry. Then I applied a pearly beige nail polish on my nails, 2 coats were enough.


After it dried off I took a cd/dvd pen and drew my designs on my nails.


Now using a thin painting brush or nail art brush fill in colors one by one. I used red for the big flower, light pink and light blue for the smaller flowers and green for the 2 leaves and also I used black for the stems. 


Now is the time for shading to give a realistic look :D

I did the shading of the red flower with yellow, light pink flower with dark pink and light blue flower with mid blue.


After shading I applied top coat and placed bindis in the middle of each flower. I used silver bindi in the middle of the red flower, blue bindi in the middle of pink flower and pink bindi in the middle of blue flower. At last I applied atop coat again to seal my piece of art :P

So here I am with my masterpiece floral nailart all done for you to see and comment.... hehehee


Though its not very clear I still hope that you all can see what I actually did with my nails :)


 Thanks everyone for bearing with me....


Wednesday, September 1, 2010

MY DISCO NAILS.... MY FIRST POST...


 Hi babes,this is my first post so I am a little nervous. Hope you bear with me for now. Today I did a simple nail art and I named it "Disco Nails". Here's how I did it...


1. First I applied Base Coat and let it dry.


2. Next comes my Revlon Nail Hardener, I just love it, 2 coats of it, let it dry.


3. Now comes the Revlon nail color in Opal Ice, 2 coats is enough since it is opaque.


4. While the polish is still wet carefully place the silver holographic discs over nails in your own style. I just placed it here and there randomly.


5. Let it dry for a few mins and top with clear polish, 2 coats will be good enough to see you through your next manicure, I used Oriflame Top Coat.


Hope you like it and create your own masterpieces and share with me. Byeeee


Related Posts Plugin for WordPress, Blogger...