

My Lovely Followers

Showing posts with label party nail art. Show all posts

Sunday, November 3, 2013

BLINGY BLUE DIWALI NAIL ART


            Wishing all my lovely followers, readers and my dear friends a very happy, blessed and wonder-filled Diwali. Hope you people are enjoying this festive season and having lots of mithais :D.

              I have this blingy-glittery nail art on my nails since Dhanteras and I have been receiving a few compliments. So here I am sharing the pictorial with you all on creating this Over The Top Blue Blingy Nail Art


Step 1- Single coat of Sally Hansen Hard as Nails as the base coat.

Step 2- Three coats of Colorbar Exclusive Nail Lacquer - 105 Peacock Blue on the nails.


Step 3- Two coats of Faces Nail Enamel - All That Glitters
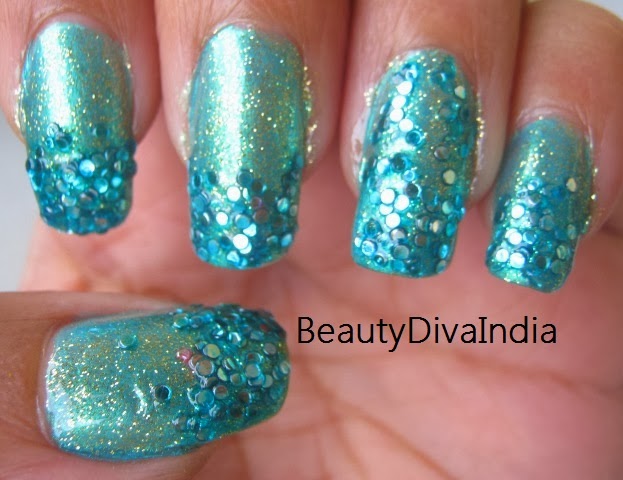


Step 4- Chunky Teal-Blue glitter on tips of each nail but full on ring finger nail.


Step 5- Three Rhinestones on ring finger & one each on all finger nails to add a more glamour & shine.


Step 6- Top coat to add gloss and seal in the art. Done!!!!


I know its a bit too glittery for some of you but this is the Festive Season and that too Diwali so I think this nail art will suit the mood.

Thank you all for bearing with me and do have a great Diwali :D


Also read:

FIREWORKS INSPIRED DIWALI NAIL ART
BLACK & GOLD DIWALI NAIL ART

Sunday, April 21, 2013

BLINGY PARTY NAIL ART

                 Hello everyone, today I have this blingy but simple nail art on my nails. I have used Oriflame Crystal Base & Top Coat, Faces Nail Enamel 22 All That Glitters and Colorbar Pro Glitterati Top Coat 002 Disco Gold. This nail art is good for parties, festivals and weddings as well.


1. Apply Oriflame Crystal Base & Top Coat on clean dry nails and let dry.


2. Now apply 2-3 coats of Faces Nail Enamel 22 All That Glitters on the tips to make French Tips and let dry


3. Arrange the gold/silver hexagons from Colorbar Pro Glitterati Top Coat 002 Disco Gold on the crescent of the French Tips.


4. Stick some of the gold/silver hexagons from Colorbar Pro Glitterati Top Coat 002 Disco Gold on the ring finger nail only. You could skip this step if you want to keep it simple.


5. Finally apply Oriflame Crystal Base & Top Coat to seal in your art. That's it you are done


Hope you enjoyed the picture tutorial and thanks for bearing with me. Have a rocking Sunday :)


Wednesday, January 23, 2013

BEIGE-GOLD BRIDAL/PARTY NAIL ART WITH STONES

               Hello Beauties,  today I have this simple but gorgeous nail art to share. Here I have used Viviana Nail Lacquer in VNL021 Moody Concoction which is a gorgeous golden beige very slight finely milled gold shimmer. I topped it with Faces golden glitter and placed the stones and some small bindis randomly and finally applied two coats of top coat. Here are the pics for you to enjoy.


Hope you enjoyed the pics. Thanks for bearing with me and have a great day :)

Monday, January 7, 2013

GREEN AND GOLD- SHIMMERY NAIL ART

                      Hello girls, today I am sharing a Green and Gold Shimmery Nail Art here after a very long time. Here I have used Oriflame Beauty Nail Shield as the base coat, next I have used Avon Nailwear Pro Nail Enamel- Urban Jungle, then StreatWear Color Rich Nail Enamel- Gold Sparkle and finally I used Konad Top Coat (Gold Shimmery). This nail art is apt for brides, parties & festivals. So here are the pics for you to enjoy.


                Hope you enjoyed the pics. Please do let me know if you girls want the step by step tutorial, I shall be very happy to put it up. Thank you and have a nice day :)

Monday, June 25, 2012

BRIGHT PINK, GOLD & SILVER NAIL ART

             Hello girls, today I had to go out for a party and I had this art on my nails. Its a tape manicure technique and easy if you can cut out straight and very thin pieces of tapes. Here are the pics for you to enjoy. Thanks in advance for bearing with me :D


Have a Happy Monday :)

Monday, November 22, 2010

RED AND BLUE BRIDAL NAIL ART


                Hi Ladies, I am here with a bridal nail art today. I have used crimson and a shimmery blue for this art. But you can use any combination you can think of or you can use the color combination of your bridal attire.


                I will try to simplify the steps as much as possible. If you have a steady hand and you know a little mehendi art you can create this one easily. You can ofcourse come up with any perceivable patterns/designs if you wish. Designs are completely your choice and up to your imagination.


Prep up your nails and apply 2 coats of the crimson nail polish. Let it dry completely.


If you want you can use a cd/dvd pen to make the blueprint first.


                      Now draw the designs on your nails. I did 2 different designs on 1 hand. Thumb, middle finger and the pinky in 1 design and index and ring finger in another design.


Outline the designs with the shimmery blue color. And let it dry completely before applying top coat.


Now you can decorate with rhinestones or other nail art jewels. I used pretty blue stones on my nails.


Apply top coat to protect and seal in your masterpiece :D You are done.


**I will be coming up with a series of posts on bridal skin care, hair care, nail art and makeup from now on**


Thanks you all for bearing with me and please do leave your comments, your comments make my day :))


Saturday, November 13, 2010

PINK & WHITE NAIL ART


Hi everyone, I have another very simple nailart which I tried this evening. Its the simplest nailart I have ever posted here. So read on for the steps you need to follow to get this look.


First apply a pink color on your nails, I applied Lotus Cozy Mulberry, 2 coats were enough. Let it dry completely.


Now paint the tips with white, 2 coats should be enough. When the tips dry, take a toothpick or nailart tool and make dots near the tips in a line.


When these dots dry you can apply top coat to protect your nailart. You are done.


Remember to use a base coat before applying polish.Try it out and let me know please.

Wednesday, September 1, 2010

MY DISCO NAILS.... MY FIRST POST...


 Hi babes,this is my first post so I am a little nervous. Hope you bear with me for now. Today I did a simple nail art and I named it "Disco Nails". Here's how I did it...


1. First I applied Base Coat and let it dry.


2. Next comes my Revlon Nail Hardener, I just love it, 2 coats of it, let it dry.


3. Now comes the Revlon nail color in Opal Ice, 2 coats is enough since it is opaque.


4. While the polish is still wet carefully place the silver holographic discs over nails in your own style. I just placed it here and there randomly.


5. Let it dry for a few mins and top with clear polish, 2 coats will be good enough to see you through your next manicure, I used Oriflame Top Coat.


Hope you like it and create your own masterpieces and share with me. Byeeee


Related Posts Plugin for WordPress, Blogger...