

Happy Holi friends!!! Here is yet another colorful Holi inspired nail art which is simple yet very pretty. You just need your colors and your dotting tools to recreate this design. Here I have lots of dots all over my nails in different sizes and vibrant colors. I request you not to aim for perfect dots.
So here is the pictorial of the nail art I created for today. Enjoy.....

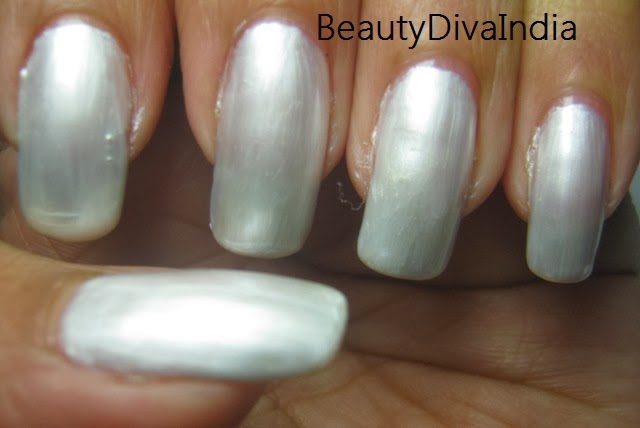
Step 1- For the base coat today I have applied a coat of Oriflame Very Me Base & Top Coat.
Step 2- After that I painted my nails with Colorbar Nail Lacquer Exclusive 37, two coats were enough.

Step 3- I painted pink uneven dots on all the nails with the help of a toothpick.

Step 4- I painted yellow uneven dots on all the nails with the help of a toothpick.

Step 5- I added green uneven dots on all the nails with the help of a toothpick.

Step 6- I added blue uneven dots on all the nails with the help of a toothpick.

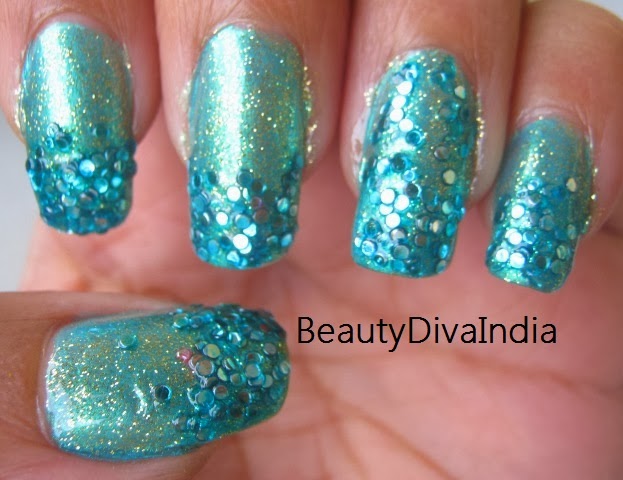
Step 7- I painted red and orange uneven dots on all the nails with the help of a toothpick again

Step 8- I added Oriflame Very Me Base & Top Coat to seal my piece of art and protect the design. Done!!!!
Thanks for bearing with me and have a Colorful Evening ahead :)
So here is the pictorial of the nail art I created for today. Enjoy.....
Step 1- For the base coat today I have applied a coat of Oriflame Very Me Base & Top Coat.
Step 2- After that I painted my nails with Colorbar Nail Lacquer Exclusive 37, two coats were enough.
Step 3- I painted pink uneven dots on all the nails with the help of a toothpick.
Step 4- I painted yellow uneven dots on all the nails with the help of a toothpick.
Step 5- I added green uneven dots on all the nails with the help of a toothpick.
Step 6- I added blue uneven dots on all the nails with the help of a toothpick.
Step 7- I painted red and orange uneven dots on all the nails with the help of a toothpick again
Thanks for bearing with me and have a Colorful Evening ahead :)