My Lovely Followers

Showing posts with label nailart. Show all posts

Friday, October 28, 2011

RED & GOLD FESTIVE NAIL ART

Navaratri inspired red and gold nail art for the festive season. Red and gold is a great combo specially for this festive season. Hope you all like my masterpiece and please do leave behind your sweet comments. Thanks for bearing with me :D


Thursday, October 6, 2011

RED & WHITE FESTIVE NAIL ART

                    I was in Kolkata for two days and the city was bustling with people in their colorful attires. But what caught my attention was the white sari with red border and golden work all over it. Its a traditional combo for the Bengalis (correct me if I am wrong) and I just loved it to bits- to the extent of buying 1 for myself on my next visit.

                 Todays nail art features the same combo as I have truly fallen in love with it. Hope you all like my masterpiece and leave behind your sweet comments. Thanks in advance for bearing with me :D


Friday, June 24, 2011

KIWI FRUIT NAIL ART

                  Kiwi Fruit is also known as Chinese Gooseberry. It contains loads of Vitamins which are good for our health. I tried this kiwi fruit slices on my nails.


Step 1: Paint all the nails with a light green polish, add a white polish in the middle as shown.


Step 2: Add bright green dots around the white parts in a random untidy manner


Step 3: Add black dots randomly amongst the bright green dots, take care not to make the dots perfect.


Step 4: Add a top to seal in your hard work and its done!!!


Hope you all like it and leave behind your sweet comments. Thanks for bearing with me :)


Saturday, March 5, 2011

YELLOW AND GREEN NAIL ART WITH STRIPES

Final Look
                 I am obsessed  with green nowadays so here is another green and yellow nail art which is so simple and so cute. I love green on nails be it any shade, don't know when I will overcome it but till then I will keep coming  up with newer green based nail art.

                 First step is to use the base coat but I mostly use a nail hardener. After it dries off, I applied 3 coats of yellow nail polish and left it to dry.

                
Step 1

                  Then I took a very thin painting brush and drew vertical stripes with a leaf green color. I double coated it to make it bright.


                   When it dried, I sealed it in with a top coat so that it stays on for long without chipping.


                   Hope you girls like it and leave behind your precious comments. I think the shades- yellow and leaf green has a touch of freshness it them, perfect for the coming summers. What you think?

ORANGE & GREEN NAIL ART WITH SILVER GLITTER

Final Look
               Hi Girls, I am in love with green nail polish these days and so I have done this green and orange nail art. The glittery look is so in right now that I cant avoid it inspite of my mom telling me it gaudy etc etc I have gone ahead and used silver glitter on top. So here are the simple steps to achieve this look.

             
                       As always I had applied my nail hardener/base coat and left it to dry for sometimes.

              
                       Then I applied Street Wear Orange Swirl on all my nails and left them to dry for 10 mins. Two coats were enough for full opacity. (step 1)


Step 1
                       Now I painted on green tips in a slanted manner and also did the same on upper part of the nails. (step 2)           


                       Then I used silver glitter on my nails and left them to dry for 20 mins.


                       Atlast I sealed in my precious nailart with a top coat.
Step 2


                       Hope you all like my nailart and bear with me. Please leave behind your precious comments and let me know your opinion. Thanks


Monday, February 28, 2011

Glittery Green Nail Art

             Hi girls, I had done these nails about a month back but  couldn't post it. I love trying out new nail art designs and this one is simple and I so love the color.

               Here I have used Avon Simply Pretty Nail Polish in Green Dream.
Its a pale green with blue undertones atleast so it seems to me :D Its a new launch of Avon along with a couple of other colors.
             
                First I applied my base coat and left it to dry and then I applied 3 coats of Avon,s Green Dream one by one, letting each coat to dry before applying the other coat.

                 When my nails were dry I applied a gold glitter polish on top to finish the look. I quite liked it but did you? Please let me know and thanks very much for bearing with me :P

Saturday, January 8, 2011

PINK & SILVER NAIL ART- SPONGE TECHNIQUE

Final Look
Hi Lovelies, wish you all a Very Happy and Prosperous New Year (Belated) :-D I had gone on to warmer parts of our country after Delhi cooled down to freezing temperatures. Sorry for not posting this long and not commenting on your lovely blogs (read informative posts). I got to catch up with all of you :) 

So to start this new year I have a pink and silver nail art for you all. This is my 101st post and am so happy and thankful to you all for your love and support.

Coming back to my nail art, this time I tried my hand at the so-famous sponge technique. Here are the steps:-

Nude Pink

I prepared my nail by cleaning and buffing them and applied Colorbar Nail Treatment.

When it dried off I used a nude pink polish on my nails (Pink Kisses, Avon Simply Pretty). I applied 3 coats altogether and let it dry completely.

Now I poured out a little glittery purple polish (Sparkling Mauve, Street Wear). With the help of a makeup sponge I applied it on 1/3rd of my nails and let dry.

Again I poured out a little silver polish on a paper (Silver French Tip, Revlon) and dabbed the sponge with the polish and dabbed my nails with it, just the tips.
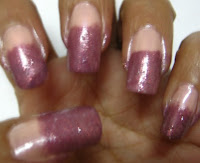
Sparkling Mauve on 1/3rd

Lastly I sealed it in with a top coat and yipee I am all done.


Though I was not satisfied with my work, my mom suggested that I should put it up here. Hope you like it and leave your sweet comments for my masterpiece :P ;)
Thanksss


Silver French Tips
 ,

Saturday, December 25, 2010

BLUE POLKA DOTS NAILART

Final Look
            Wish you all a Merry Christmas and a Wonderful new year 2011. 
            Today I am here again with a new nailart. This time its blue with white, yellow and bright orange polka dots. Here are the steps to recreating this nailart-
            * First I always prep up my nails with a base coat or a hardener.
            * Then 3 coats of blue polish and aired it for about 10 mins before beginning my 'art' :D
            * Now I randomly placed dots with white polish on every nail and let it dry completely.
            * Taking yellow polish I reapplied dots over white dots.
White Dots
            * Also I did same with bright orange polish and left 2-3 white dots on each nail as it is.
            * Now the top coat to finish off and voila..... its done :D

Hope you girls like it and leave your sweet comments behind. Thanks :)

Monday, December 13, 2010

CHRISTMAS NAILART- SIMPLE DIY NAILART

My Candy Nailart
              I got a complaint from a reader of my blog complaining I do a lot of complicated nailart these days. She has requested me to come up with simple do-able nailarts for this festive season. So here I have a very simple diy nailat for Christmas. Candies are the first thing I think about when I think about Christmas :D Today I have the candy nailart for you all and specially the candy lovers.    

Here goes the steps:-
          I always wear a base coat/nail hardener on my nails before applying nail polish. So prep up your nails as you wish.

          I applied white polish as the base color and 3 coats were required for full coverage.
I left it to dry for about 10-15 mins and then I took out my (dear) painting brush and dipped it in red nail polish and painted the stripes. Sorry for the uneven stripes :P

          I painted 2 thin stripes and 1 fat stripe with red polish to get the required look. I aired it for about 10 mins and sealed it in with a top coat. Clean off the extra nail color from around the nails, I didn't do it before taking the pic :P

         All done- sweet, simple and easy :D
         Hope you guys like it and leave behind your precious comments :)

Related Posts Plugin for WordPress, Blogger...